Thursday, September 25, 2014

Selvage Wrapped Coiled Baskets

More than two years ago, I was given two large plastic food canisters filled to the top with the selvages cut off the ends of fabric. I had mentioned I was into making selvage quilts and my friend Vicki decided to save them for me. When I cut selvages to make a quilt, I always leave at least 1" of printed fabric beyond the selvages. Many of the pieces that were gifted to me were basically only the white selvages themselves with little to no colored fabric included. Being the fabric hoarder that I am (like many quilters), I put them aside to figure out what I was going to do with them at a future date.

This past week was that future date. I was cleaning the sewing studio and found the plastic containers jammed packed with selvages. I pulled them out and the great idea lightbulb went on over my head. I sat and sorted them into white and off white selvages and separated those from the other colors. I put them next to my favorite evening space along with some cotton clothesline and glue sticks. I was going to wrap a couple of hanks of clothesline up and make baskets to see how the selvages would look. Here is what the first wrap looked like before sewing.


Before I was halfway through the first 50 feet of clothesline, I could tell I was on to something new and unique. The printing registration circles, numbers and colors were really pretty offsetting the bland whites and off white. The printed words on the selvages themselves created their own random patterns. Those printed details come in all types of fonts and colors. I made sure I used many different types. Often there are printed symbols and shapes in these often discarded fabric edges, and these can be seen in the finished wrap and basket if you look closely. They almost resemble hidden hieroglyphs like those used by the ancient Egyptians.

In some cases, the inner edge of the fabric has a small 1/8" or so of fabric that contrasts nicely with the rest of the selvages. When wrapped tightly and consistently, these will create diagonal stripes that run through the basket. My BFF Martha, said they look to have a special morse code visible to the naked eye.

I was concerned that the tightly woven selvage edges might prove to be difficult to sew on my home machine, but a clean, freshly oiled and well tuned Bernina is up for the task with a sharp new #90 needle. I decided white cotton thread would be my best choice to construct the baskets. It was the right choice to blend with the myriad of colors found in the selvages I used.

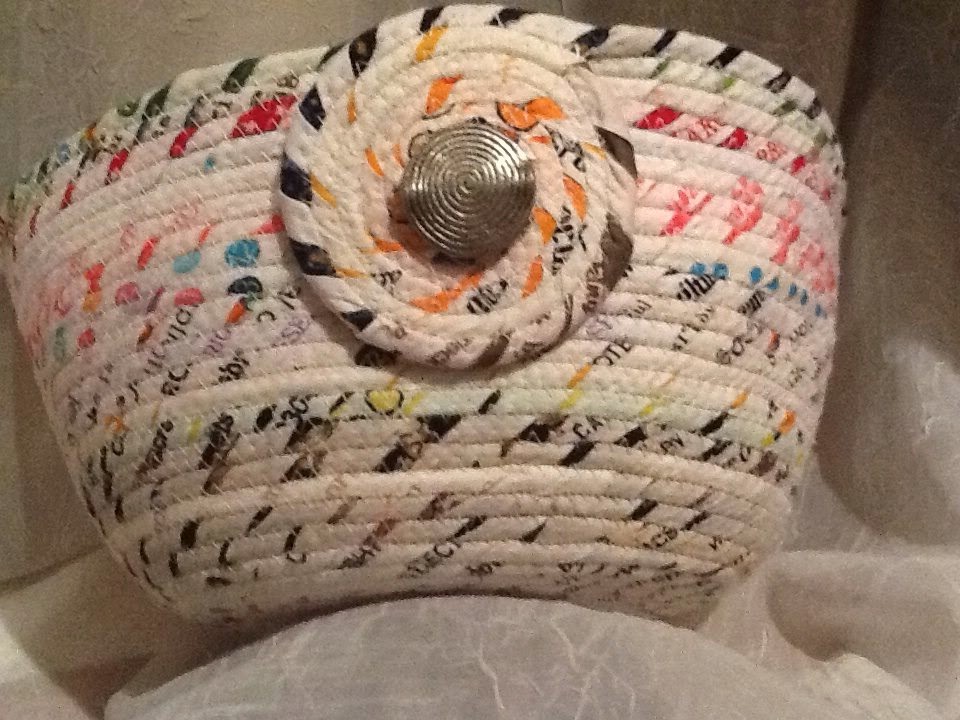
The first basket I created was a basic round shape with a nice round medallion on the front. I found a really cool key and newspaper feather pendant which I attached after sewing the basket. I love the way it turned out.


The next few I made from selvages were oval shaped baskets. The first one is from dark color selvage edges and the second one is light colored selvage edges. I especially love the fun little apple tree embellishment on the first one.


It had been awhile since I created a square shaped basket. I decided I wanted to try to make a circle in a square basket from selvages. When I was done with it, I knew I had the perfect glass embellishment for it.

One of the wraps I created this week was a 100 feet in length. It makes a really big basket and this is what it ended up looking like when sewn. I decided to try and create the scalloped edges for something different and I think it's a pretty cool look. The scallops are very time consuming to sew. It's hard to ensure they are similar in size, pointing in the right direction and he coils are joined at the right places and secure. But I think they are well worth the extra effort, don't you?


I especially love the idea of up cycling something that would normally be tossed out. It's also really fun to figure out which little embellishments will work to enhance the front of the basket. While I think they are interesting and beautiful without embellishments, I like to add them as my own little artistic signature. No two baskets are ever exactly the same and it's another reason I think people are fascinated by them and want to pick them up and touch them. They are also very useful decorator items, help to keep my crafting and sewing/quilting supplies organized and they make a great hostess gift when I visits.

Here are a few more that I made this last week or so.


#savethoseselvages #selvagebaskets #clotheslinecoilbaskets #circleinasquarebasket #wavebasket #upcyclingselvages

Easy Weekend Mediterranean Chicken

I have had a really busy few days. My BFF, Martha, came to visit on Sunday and we had the added bonus surprise do my BSI, Peggy decide to come and visit also on the spur of the moment. I had gone to the grocery store early after putting the Lemony Delight Bundt cake in the oven to pick up some chicken and small potatoes to make a huge pan of Mediterranean Chicken and Veggies. I wanted to prep everything and have it ready to just pop in the oven so I could spend time with my guests. Pathmark had the big tray of boneless, skinless chicken breasts on sale as well as a gorgeous head of fresh cauliflower and the potatoes And green beans I needed.

I ended up using my largest turkey roster pan to prepare the dish. I washed the chicken breasts, trimmed off any excess fat(there wasn't much) and patted them dry. They were so huge, I cut them in half crosswise so they would cook more evenly in the pan. Into the pan I added, EVOO, the juice and zest of 3 large lemons, 1 tsp salt, 40 grinds of fresh peppercorns, some Italian seasonings(dried), and one large clove of elephant garlic which was coastline chopped.

I also raided my dwindling herb garden for some fresh basil and rosemary along with a touch of parley. I washed these and chopped the parsley and basil and added along with the rosemary leaves to the mix. Tossed in the cut up chicken, the scrubbed and quartered red potatoes (skin on) and the washed and chopped cauliflower florets. I vigorously tossed all of ingredients in the pan to coat and then arranged the chicken along one side and the veggies on the other. If you Re wondering about the green beans, I like mine crisp, so I opted to steam those separately just before serving the meal. For a quick alternative, you can,is them right into the bug pan and roast along with the meal.

I covered the pan with foil and placed into the fridge for 6 hours to allow it to mArinate and the flavors to meld. My kitchen and fridge smelled heavenly with the garlic and rosemary all day.

Martha and I along with my dogs, spent the entire day outside sewing! It was the perfect September day, warm, sunny with a cool breeze that kept the bugs away. It was a lovely visit and the pups enjoyed being out ALL DAY!

Around 4 p.m., I lit the oven to 350 degrees and popped the big foil covered roaster into the oven. set the time for 50 minutes and let it work its magic. Mike was hime by then and Peggy was due to arrive just in time for dinner. when the timer pinged and told me dinner was almost done, I pulled the pan out, removed the foil, checked the meat to make sure it was cooked properly. I put the oan back I. The oven for 10 minutes while I prepped the beans and steamed them in the microwave for 5 minutes. everyone pitched in to set the outdoor table quickly and efficiently. The dogs knew dinner was about to be served And miraciously stayed out from under our feet. P

Just as I was taking the roasting pan out of the oven 10 minutes later, Peggy showed up and we sat down to the gorgeous meal. I had purchased an fresh baked loaf of Olive bread at the store that morning, which was sliced up and served with fresh butter. perfect for sopping up any juices from the main dish.

The chicken was delightfully juicy, tender, flavorful and plump! The red potatoes were perfectly roasted and dripping in pan juices and fresh herbs. The roasted cauliflower was sweet and tender, almost melted in your mouth. It was a wonderful meal and perfect ending to a fantastic day.

We enjoyed the lemon cake and coffee afterwards, just as the sun was disappearing behind the horizon. we came inside to relax afterwards and around 8 p.m., Peggy looked at me and pointed out to me that it was like we didn't even own any pets because they were passed out solid on their beds. They were exhausted from being active and outside the entire day, having missed their afternoon naps.

Easy Autumn Pumpkin Spice Bundt Cake

This is without a doubt one of the easiest cakes to bake. Not only is it moist from the pumpkin, but it's really low fat because there is no oil or eggs added. Essentially there are only three ingredients needed:

1 box Spice Cake Mix
1 15 oz Can of Pumpkin
1/2 cup of warm water


In addition, I added some other ingredients to bump up the spice and flavor to entice my tastebuds.
1 tsp orange flavor extract
A few shakes of pumpkin pie spice
A dash or two of allspice
6 drops clove oil
1 tsp vanilla extract

Blend all ingredients in your mixer until smooth, scraping the bowl often to ensure the cake mix is well blended and the wet and dry ingredients are combined. This is a very thick batter. It took about 4 minutes on medium speed to get to the right consistency.

Prepare your Bundt pan, by spraying with baking spray. Sprinkle the inside of the coated pan with a touch of cinnamon or pumpkin pie spice. Just a little will do. Pour the cake batter into your pan and then gently smooth the top of the batter in the pan so it touches the sides and the thick batter is evenly distributed.

Bake in a preheated oven at 375 degrees Fahrenheit for 40 minutes. Check for doneness by inserting a toothpick into the center of the cake in the pan. If it comes out clean, it's done! I used a silicone tulip Bundt pan for this cake and it only took 40 minutes to bake all the way through. That is shorter than most of the other bundt cakes I've made to date.

Cool the cake in the pan for 15 minutes on top of a rack. Invert the cake onto your serving platter, remove the pan and allow to finish cooking for another 45 minutes.

If desired, make a spiced orange glaze to drizzle on the cake.

To make the glaze combine 1/2 tsp cream cheese frosting flavor, 1/2 tsp orange extract, 1/8 tsp pumpkin pie spice, 1 TBSP skim milk with 2/3 cup confectionary sugar. Whisk together until smooth. You may have to adjust the amount of milk,or sugar used until you get the desired,consistency for your glaze. I like to thicken it up a bit by placing it in the fridge while the cake finishes cooling. Drizzle over the cake as desired before serving.


Cake will keep for 2 days covered at room temp or 4 days in the fridge covered. Note: It's so yummy it probably won't last that long!


#autumnspicecake #pumpkinbundt #yummycake #tulipbundtpan

Wednesday, September 10, 2014

Putting a Value on Your Quilts and Hand Crafted Items

I have been sewing for more than 45 years and quilting for at least 35. Until recently, I never really sold my quilts, most were made as gifts and given away to my family and friends. On rare occasions in the past, I have made quilts for close friends and they paid me to do so. I really didn't make money on those, they were priced at a cost of goods to make the item plus a few bucks to cover incidentals and a small portion of my time.


Now that I am retired, and needing to downsize my stuff, including my quilts and stash, I have decided to try and sell some items. I was hoping to generate some income in doing so, to help pay bills and keep my savings intact. I am trying two venues to sell items. One will be etsy, the well known website where many people have built successful businesses selling their handmade goods. The other is a new local gift shop.

Etsy is easy. You post beautiful pictures and descriptions of your items and post them on your own store within the site and pay a small fee per item to list them. Keywords are used to help potential customers find your items when they search the site and the web. Customers use paypal or credit cards to send you their payment for the item and for shipping and you package up the item and send it to them. The shop owner determines the selling price, shipping costs and which items to advertise, as well as being the one responsible for ensuring the customer receives the item in a timely manner.

Selling items on consignment is a more passive method of getting your goods to market. The consignment shop owner is responsible for advertising, photos, goods placement, marketing, inventory control and ensuring the artists gets paid for their items in a timely manner. In exchange for use of their space and time spent selling your items, they get an agreed upon amount of the final sale price. Terms of the percentages of their take and yours is typically based in a contract or agreement. Consignment rates vary from shop to shop. I believe all are negotiable. Some want a 70/30 split, or 60/40 split where the artist gets the 70-60% and the shop keeps the 30-40%. I think you will find that many shops want a straight 50/50 rate, where you each get half of the selling price of the items you consign.


What does this mean to the artist? Someone is making money off the items they sell and market for you. You have to be willing to price your items fairly and at price points where the items will move, instead of sitting on the store shelves for extended periods. It can be difficult to allow someone to have 40-50% of the price of an item you worked hard to create. However, if the shop has a good established customer base and is located in a market where the economy supports your pricing structure, you can both benefit. For those of you that prefer to create instead of sell, this could be the perfect situation. The artist makes and delivers the items they wish to sell and the shop does the post production work to get the items sold. I highly recommend offering items at varying price points to see which items sell easily in their shop.

The hardest part of all of this is determining what the market will bear in regards to certain handmade goods. Only once in my life did I have a customer refuse to pay what I wanted to charge for a large bed sized quilt. He had purchased the item as a wedding gift for his sister. He felt the queen size quilt should be priced around $60-$100 and I wanted $300 for the quilt. Keep in kind that a queen sized quilt contains at least 7-8 yards of fabric on each side plus 1 yard for the binding and an appropriate sized batting. While I buy my batting at wholesale prices, the cost of the batting would be approximately $25 for quality cotton batting. The fabric costs for quality cotton run approximately $10-11 per year in the current market. If I used 15 yards of fabric @$10 per yard, the estimated cost of goods invested into creating that item would be $175 initially, not counting thread, design and construction time. Even at $300, the quilt took me 20 hours to complete including the binding. Dividing the remaining $125 over cost for manufacturing the quilt, and it works out to be $6.25 per hour I would have earned to make that quilt if it sold for $300. Long story short, I wasn't willing to sell him the quilt for less than $300 so I kept it and he had to find another gift for his sister. We are still friends...


Here are my thoughts on this. Yes, customers can buy a quilt in the local department and discount stores for under 100 dollars. You do not know the origin of that quilt or the content of the materials used to make it, labels are often incorrect. Often these hand stitched quilts are inferior quality fabrics, filled with poly blend battings and when washed the fabrics will shrink, get lumpy and fall apart. They are not built to last like the quilts made by real quilters. They are quilts made by big manufacturers to be marketed to to the masses to look like someone hand made them for you. You can even find quilt bargains on websites such as etsy, ebay and amazon.com. I have been known to buy vintage and antique quilt tops to finish from ebay. I feel like I have a quilt rescue service going sometimes with this treasures.


As a professional quilter and basket maker, I believe I am entitled to make a fair wage for the quality of the items I craft. Many people that do not sew or craft, do not fully understand the amount of work and skill involved that goes into making one basket or quilt. This is one of the reasons I enjoy teaching so much. The most common question I get when displaying my quilts is, "How long did it take for you to make that?" I wonder if they really want to know or that is just their way of being polite and they don't know what else to say when looking at my work. I have found that some of my customers are also quilt makers who truly understand the time, materials and effort that goes into each individual creation.


#quiltvalue #consignmentterms #handcrafted #pricingquilts

Tuesday, September 9, 2014

Quilt Class Samples

After I finished 3 samples for an upcoming Applique class I will be teaching, I started working on samples for a strip piecing class that I will be teaching in November.

I have always loved piecing better than applique, and strip piecing is so easy to do. I was asked to create 4 blocks that can be made from a jelly roll. I have a rather large collection of jelly rolls and bali pops in my possession for a long time. They sit on the shelf waiting for me to be inspired to create something with them. I especially enjoy that I can pick one up, and start sewing with them almost immediately, with little to no cutting and very fast results.

I was surfing the web today and found hundreds of free patterns for jelly rolls. There are many books also available on how to use these these little fabric packs. After about 20 minute of surfing I had found my inspiration and have now jotted down some ideas to try and create the 4 blocks. The shop owner, Beth, gave me the fabrics to be used to create the sampler quilt.

It am mocking up the designs with my own fabrics first, to ensure the actual shop samples do not have any mistakes in them. I have to tell you, it's harder than it looks to create new designs from scratch and then make them rice to ensure your instructions are clear and without errors.

I found the coolest little seam ripper recently and it's been getting a good workout this week so far. It is called SEAM FIX. It essentially is two pieces and one end has a little ridged rubber nib on it that is a very cool feature. You rip the stitches out and then rub the rubber tip across the fabric and it removes the broken stitches quickly, easily and completely. Kudos to the designer of this little gem! Pick one up at your favorite quilt shop. The come in two sizes and run between $4.25 and $7.00 each. Well worth the price of admission in my book. Here is a picture.
I like that you can cover the sharp end when not in use or when traveling back and forth to classes. It will protect it and certainly make it last longer. When was the last time you replaced your seam ripper? Most quilt shops stock these and I highly recommend you try one!


Sunday, September 7, 2014

Spicy Autumn Apple Cake

This week, everyone is celebrating the return of the new school year and while the weather doesn't feel like Autumn yet, the calendar shows its already September.

I decided to welcome in the new month with an Autumn Apple Cake.

I had finally found my missing Star bundt pan hidden away in a cabinet up high on the shelf out of site. I couldn't wait to use it because it really does make a pretty cake.

Ingredients:
1 package yellow cake mix
1 package instant vanilla pudding mix
1 cup applesauce
1/2 cup water
1/3 cup vegetable oil
3 eggs
1 egg white
1 1/2 tsp pumpkin pie spice
4 drops nutmeg oil
4 drops of clove oil
1 tsp rum extract

Preheat oven to 350 degrees F. Prepare bundt pan with grease and flour or spray with baking spray. To ensure easy release of finished cake, use a brush to wipe inside the pan and ensure the coating is even.

In a large mixing bowl, blend all ingredients. Mix on medium high speed for 3 minutes. Pour evenly into prepared pan. Place a towel on the counter and gently tap the batter filled pan several times to remove any air pockets.

Place in a preheated oven for 50 minutes at 350 degrees F. Cake is done when tester or toothpick inserted into center of cake comes out clean. Cool in pan on cooling rack for 30 minutes.

Invert cake onto serving platter, tapping pan to release cake if needed. Cool completely (approximately 1 hour).

Drizzle with Spiced Glaze (see below).
Spiced Glaze ingredients:
1.5 cups powdered/confectioners sugar
1 TBSP softened butter
1/2 tsp pumpkin pie spice
2 TBSP of cold milk
4 drops of nutmeg oil
Blend together in a small bowl until smooth. I use a whisk to get it nice and shiny smooth. Spoon or drizzle over cooled cake and if desired, sprinkle with a touch more pumpkin spice on top for color.

I would recommend keeping cake in fridge covered, until it is gone. It won't last long, I guarantee it!
Makes 12-14 servings.


Thursday, September 4, 2014

Cinnamon, Chocolate, Banana Bundt and Lemony Delight for Martha

I was up at 6 am this morning to let the dogs out. I'd had a good night's rest so I out the coffee on and set out to bake two cakes. One was for us and the other to take along to a friend's tomorrow.


My Lemon cake was simple.
Ingredients:
1 box lemon cake mix
1 package lemon pudding
2 TBSP fresh squeezed lemon juice
Zest from 2 lemons
2 tsp lemon extract
3 whole eggs, lightly beaten
1/3 cup Canola oil and
1 cup of water.
Add all ingredients except the zest to the mixing bowl and stir until moistened. Beat on medium high speed for 3 minutes. Add the lemon zest and beat for another 30 seconds or so.
Scrape down beaters and pour into prepared bundt pan. I used the rose pattern Bundt pan for this lemony delight.

Next I mixed up a batch of Cinnamon, Chocolate and Banana cake batter and baked it in the Bavarian pattern Bundt pan.
Ingredients:

1 Chocolate cake mix
1 box chocolate pudding
4 eggs
2 very ripe bananas smashed
1 cup water
1/4 cup oil
1 tsp rum extract
3/4 cup cinnamon chocolate chips

Add all ingredients except cinnamon chips to the batter bowl and beat for 3 minutes until smooth. Scrape down beaters and bowl as needed.

Pour 1/3 of batter to prepared pan. I used baking Pam and then I sprinkled the bottom inside of the pan with some chocolate and coffee bean sugar I had on hand (from Trader Joe's). I ground it right into the greased pan, then tapped it around so it stuck to the sides and center tube a bit. Add approximately 1/3 of the batter the pan. Then add the cinnamon chocolate chips over the batter, evenly distributing them around the ring. Top off with the remaining batter. Use a spatula to smooth the top of the batter in the pan.

Tap both pans on towel placed on counter to remove any air bubbles. Place in oven preheated to 350 degrees Fahrenheit. Bake for 45-50 minutes. Cakes are done when tested with a cake tester or toothpick and it comes out clean. Cool in pan, on rack for 30 minutes.

Invert each cake onto serving platter.

To complete the Lemon Delight, make a simple lemon glaze. The lemon glaze is made from 2 TBSP fresh squeezed lemon juice and 1 cup powdered sugar. Whisk together until smooth. Drizzle over cake as desired. My BFF's son thought the cake was so delightfully tasty, he opted for a second piece!

The Chocolate cake stood on its own with no additional glaze or sugar needed. We served each slice with a small dollop of whipped cream.
Perfect!

I was quite surprised at how great this combination turned out. The cinnamon chips melted nicely into the finished cake and the bananas added a lot of buttery texture and banana flavor to the deep rich of the chocolate cake. It was moist and very delicious. The chocolate and coffee bean sugar I had coated the baking pan with added a beautiful sheen to this one.