Wednesday, July 30, 2014

Quilt Odyssey 2014

I have just returned from the Quilt Odyssey 2014 gathering in Hershey PA. The show ran at the Hershey Lodge from July 24-27. I have personally attended this show numerous times in the past, but had missed it last year. This year, we decided that a big group of us would gather together and see the show, shop, dine and catch up. There were 15 of us in all from PA, DE, MA, CT, And NJ. Two of my closest friends, Peggy Burdge and Betty Ferraro had entered their quilts into the show contest and had their quilts accepted. Another friend and fellow long arm quilter, Donna Hoover, of Timber Villa quilts had quilted both of their quilts.


My BFF, Martha Clay and her lovely sisters, Fran and Trish, drove from Massachusetts on Friday night to CT, and then to Fair Lawn early Saturday morning to pick me up and head to the show. Less than 3 hours later, we arrived in Hershey and met up with Peggy, Betty and Jeanne in the lobby.

The show quilts were pretty awesome this year. There were many large quilts and some antique ones in a special exhibit. I took photos of many of the contest quilts to share with those friends and fellow quilters that did not have the means to attend the show. It was a pleasure to see Betty beaming with pride over her second place ribbon for small wallhanging pieced quit in the group category.

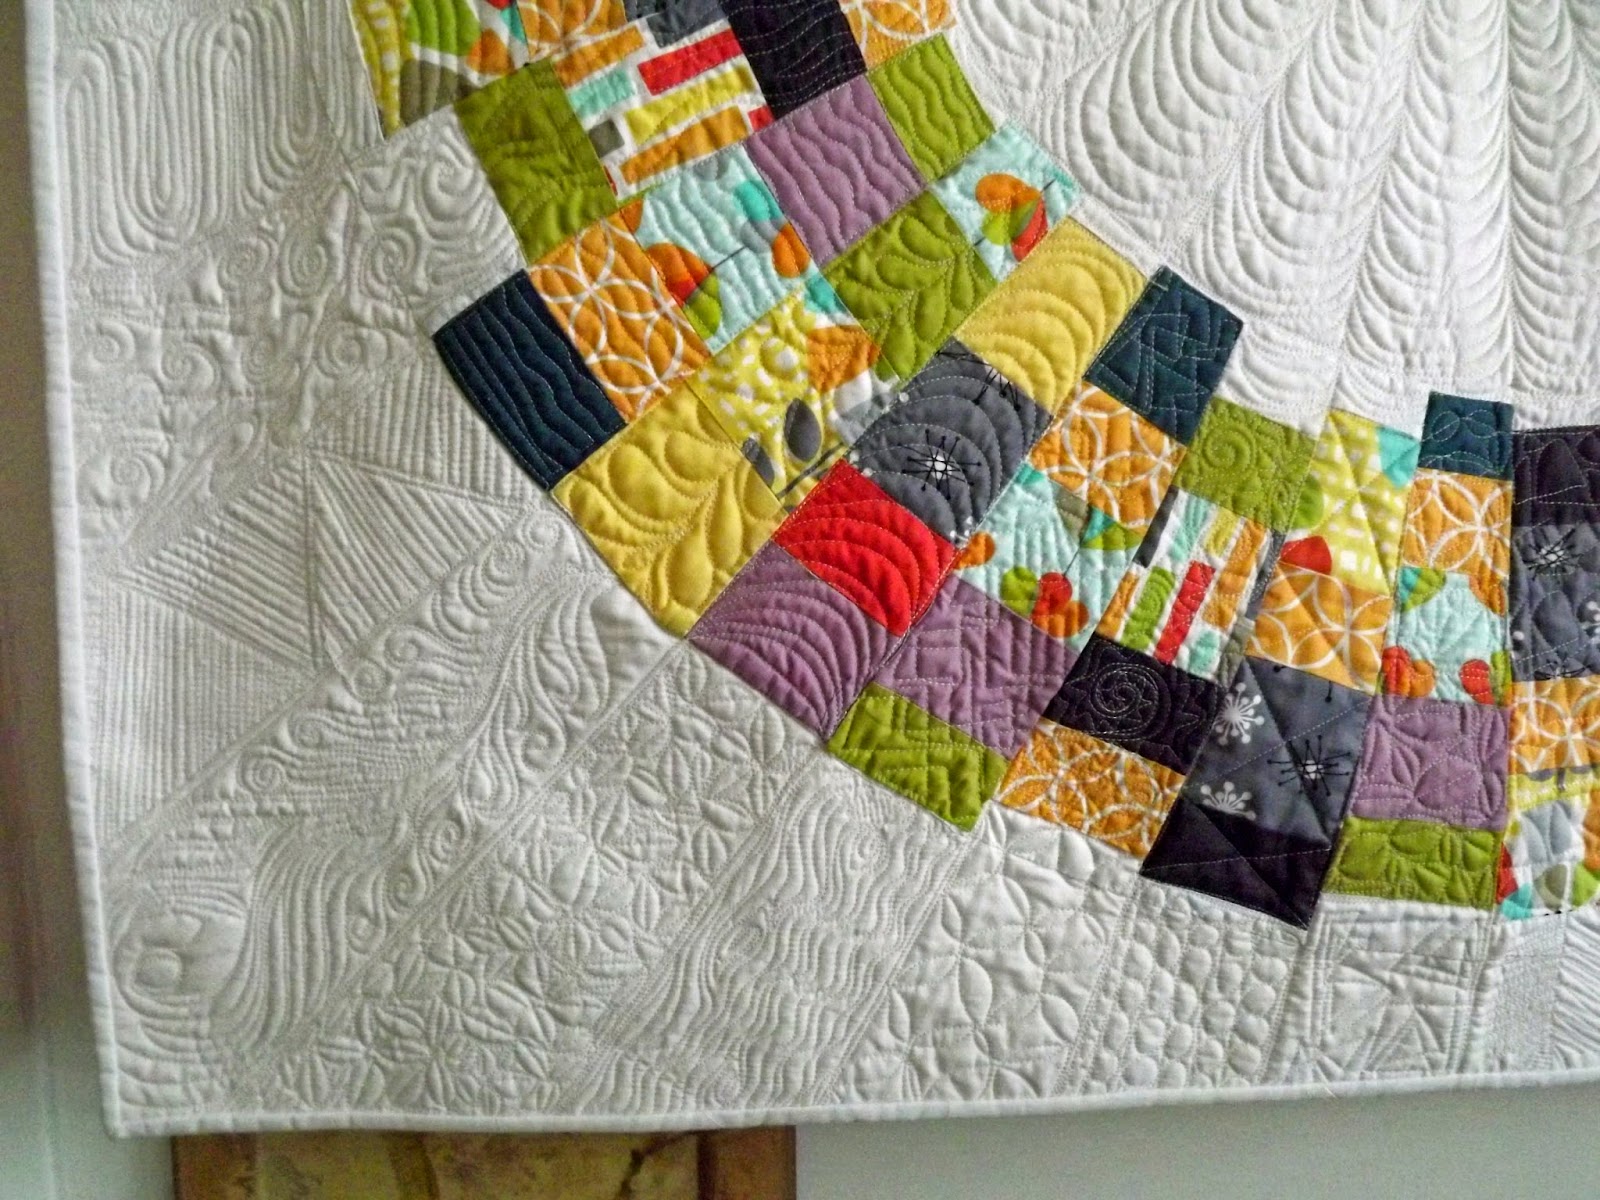
Across the aisle, my sister, Peggy Burdge's quilt was hanging. It was a modern pictoral art rendition of a photograph she took of her great nephew when he was two. The lighting from above showed the intricacy of the quilting Donna had masterfully done and the 'Jay Jay' quilt looked like a winner to me. Peggy was so happy to have it juried into the show. I am proud of her.


We wandered around the quilt show, stopping to look at all the quilts on display. I was amazed at the wide variety of quilts in the show including pictorial, applique, pieced, mixed and even a few modern quilts. The machine quilted pieces far outnumbered the hand quilted items. Many were highly embellished with threads, ribbon, photos, crystals, beads and other items. I was also very pleased to see a large number of original designs. Quilt Odyssey is not a big show, but it is well laid out and there is plenty of room to move around the aisles even when the show is crowded.


There was one quilt at the show which blew my mind with its impeccable details. The quilt took a blue ribbon in its category and was voted the Best Pictorial quilt in the show. I was surprised it didn't win best of show, but that honor went to a very traditional, hand mad quilt. My favorite quilt was a combination of applique, piecing, embellishment and fabulous quilting. Everywhere you looked in the quilt there were surprise elements to please the onlookers and the individual leaves and tiny pieces were all quilted individually and tightly.


After we finished looking at the show, we decided to eat lunch before hitting up the vendor mall. We opted for a sit down restaurant meal, a wise choice. Cobb salad and iced tea made for some good fuel for me to shop the afternoon away.

The vendor mall was next on our adventure. The primary ballroom was filled with row and rows of vendor booths selling their quilting related wares. Fabrics, notions, machines, patterns, books, thread, jewelry, furniture, more fabrics and even wool products. I have learned over the years to do the vendor sweep first before purchasing anything for several reasons. 1--when you have a limited budget you want to make wish choices. 2--you need to see what is available from all and then decide where to spend your money. 3--it's best to buy what you need at the end of the day so you don't have to cart it around the show all day. Thread and fabric can weigh a lot and my knees aren't up to supporting extra weight for hours on end. 4--Prices on the same item can vary widely. For example, i saw a particular seam ripper in at least 20 booths for sale and the price ranged from 2.75 up to 7.25. That's a big difference and I like to make sure I can get a bargain whenever possible.

I had a list of threads that I needed to our purchase for my long arm quilting business. I went ahead and got those cones selected and paid for them. There was on,y 1 color I wanted that they didn't have, but it wasn't a color that I need immediately. I also decided to try some different types of threads, all made by Superior. Superior threads are the best in the industry for long arming in my humble opinion. I am slowly replenishing my thread stock with Superior threads because they just work so well in my Gammill.

I also purchased a number of Kaffe Fassett fabrics and some novelty fabrics in two different booths along with a couple of fun notions. I stayed well within my allotted budget for purchases and found a few things to out onto my wish list for future purchases.

We had a nice dinner outing with 13 of us at a local place. The food was great along with my Blueberry Wheat beer to wash it down. I managed to take a couple of photos of the group after dinner, you never know when we will all be together again.


Thanks to my BFF, Martha Clay, for driving back and forth to the show, thanks to Fran and Trish for providing stimulating conversation the entire trip and to Peggy and Betty for taking a dare to show their quilts, giving us a reason to gather. The next time all of us will be together again is likely April 2015 at our annual Friends retreat in Lancaster county.

Since coming hime, I have been so energized from all those beautiful quilts and being with my quilting buds that I have finished 2 customer quilts in 2 days. I guess that makes me an extrovert after all.

#QuiltShow #QuildOdyssey #HersheyQuiltShow

Tuesday, July 29, 2014

Sandwich faces

Yesterday evening I was surfing the web and Pinterest and I came across some photos of creative sandwiches that had been cut up and decorated like funny faces. I thought, I can do that. I jokingly posted the link on my FB page. It got a few fun comments and I was encouraged to make one for Mike for lunch today.

However, I forgot to buy a fresh loaf of sliced bread yesterday when I shopped. Must have had a senior moment forgetting such a staple item, but hey, I am 55+ and I did get my 5% senior citizen discount for shopping at Pathmark on a Monday. It's the first time I actually used my age to get a discount!

But I digress. So I went to make us both sandwiches and all I had for bread was what Mike calls hockey pucks. They are whole grain round thin sandwich flats, which we usually eat with our chicken burgers. I thought, well, I can use them, but I won't be able to make a very big funny face sandwich like the examples I found online. These sandwich rounds do not present alot of real estate to work with to make facial expressions. However, they are healthier than bread and I prefer them to sandwich bread.

I used light mayo, salami and thinly sliced cheddar jack cheese to fill the sandwiches. Then I cut thru the sandwich off center to form the mouth. I used a half slice of salami to make the tongue and inserted into the cut. I added a cut grape for the eyes and sliced a baby carrot lengthwise for the eyebrows.


Mike got a big kick out of the little face and I will probably make more of these when we eat sandwiches again or the grand kids come to visit.

#SandwichFaces #sandwichIdeas


Tuesday, July 22, 2014

Pantry Magic

Today's discussion is on how having a well stocked pantry and fridge are great when plans change unexpectedly.

I had a customer appointment for a quilt drop off this particular afternoon. I made sure I was ready to receive them however, they did not show. Not sure why, no call or email from them. This means that I was not able to perform my grocery shopping duties as planned after the appointment. Thank goodness I have a well stocked pantry (my family makes fun of me for this and call me a food hoarder). And last week's shopping yielded a fridge pizza crust, shredded cheese, some fresh asparagus, fat free ricotta cheese and some leftover baked chicken. The pantry had canned pumpkin, mushrooms, dried pasta and other canned goods that I could use.


So I had to make a decision, pumpkin pizza, white pizza, or pasta de jour? I decided that the whole wheat crust would work nicely with the white pizza, fresh cheeses, shredded chicken, asparagus and spices.

I baked the roll out dough for 8 minutes while I prepped the ingredients in a 400 degree oven. Once the crust was rolled out and baked, I spread a nice layer for fresh ricotta cheese over it. I sprinkled it with our favorite spices, including oregano, garlic powder, pizza seasoning and basil. Over top of that I laid a heavy layer of shredded pre-baked chicken and asparagus tips that I had micro cooked for 2 minutes. Then I loaded on the mozzarella cheese and shredded Parmesan cheeses, added a few twists of fresh ground pepper and popped it into the over for 12 minutes.


The results were pretty good. The whole wheat crust was complemented perfectly by the cheeses, chicken and asparagus.

I will make this again!

Monday, July 21, 2014

Rocking My Inner Betty Crocker

A couple of months back, I decided that I wanted to improve my baking skills and try some new recipes that I had been collecting on Pinterest. I had never been a really good baker and always dreaded when someone asked me to bring dessert to their party when I asked them wha I could make to bring. I decided that it was high time to learn how to bake and set out to try cakes.

I wanted to keep it simple, be able to make delicious cakes that were better than store bought and healthier because I could control the ingredients. I read somewhere that you could still use a boxed cake mix, add certain ingredients and viola! With some time and the proper equipment, you are baking some yummy goodies.

I had an inexpensive stand mixer that I purchased years ago at a discount store, gathering dust on the box in the basement. I brought it out, along with several bundt cake pans that I had managed to accumulate over the years. I started with:
1 boxed lemon cake mix that was on sale
3 eggs
1 and 1/3 cups of cold water
1/3 cup vegetable oil
2 tsp lemon extract
1 box lemon flavored pudding
1/2 cup shredded coconut

Preheated the oven to 350 degrees F.
Added all of the ingredients except the lemon and coconut and mixed on medium speed for 3 minutes, scraping the bowl down to ensure the batter was well blended and smooth.

I used my lemon zoster tool to remove the lemon zest right into the batter. Then I cut the lemon I half and squeezed all the juice into a cup, catching the seeds so they didn't end up in the cake. My lemon press yielded about 3 TBSP spa of fresh lemon juice. Then I added the juice and coconut right into the batter and let it mix for about 30 seconds more, justo ensure the batter ingredients were folded in nicely.

I sprayed my rose design bundt pan with PAm am for baking. This wonderful spray has the oil and flour mixed in. Then I took a small bristled paint brush and wiped the inside of the pan and the tube in the center to ensure every surface was well coated evenly. This step really helps to ensure the cake comes out evenly and the spray doesn't pool in the petals of this intricate pan.

I poured the batter into the prepared pan, spinning the pan as I did to make the batter distribution balanced. I placed the pan on a folded dis towel and then gently tapped it three times in the counter on top of the towel to release any air pockets before popping the pan into my preheated oven.

I baked the cake at 350 for 50 minutes. While the cake mix said 42 minutes, I found with the extra ingredients such as the pudding and coconut, it needs more time to set up properly. At 50 minutes the toothpick test comes out clean and the cake is ready to be laced in the pan in a rack to be cooled. I left it to cool for 40 minutes before inverting onto a cake platter and dusting with powdered sugar lightly sifted through a small sieve.

I think the cake turned out beautiful and I can't wait to try it for dessert after tonight's dinner.


Friday, July 18, 2014

Michael Miller Fabric Challenge 2014

As a member of the North Jersey Modern Quilt Guild, I had the opportunity to participate in the 2104 Michael Miller Fabric Challenge. We were given several 9" wide pieces of Michael Miller's new fabric line, entitled Petal Pinwheels. We were given fabric in May and the deadline was June 23rd. Life got a little crazy for me in May due to some serious family illness, so I was pretty sure I wasn't going to be able to complete the challenge.

However, the deadline was extended until July 25th, so now that my husband is recovered from his open heart surgery and life is back to normal, I knew I needed to make a quilt for the challenge. The inspiration for this quilt, which I call "Arc Reactor", was from a website that I found when I googled "WONKY DRESDEN PLATE". The website is called thegirlthatquilts.com. Another guild member was looking for the pattern and I helped her find it. Little did I know that she was looking for it to use as her challenge quilt. However, I decided that I wanted to make my own version of this wonky, modern dresden design. I purchased additional MM solids at my local quilt shop in purple, green, charcoal and two yellows to use to complete the quilt. I already had a basic white solid for the background. I cut strips of varying widths from all of the fabrics and sewed together 9 strata to be used to cut the wedges out to form the arc of the quilt. I wanted the edges of the arc, both inside and out to be 'wonky' so I added strips of the white to each of the strata on either end. I thought if I carefully varied where the die was used to cut the pinwheel wedges it would give me the look I was after.

I employed my Accuquilt cutter and the Go! 9" wedge die to cut 70+ wedges in less than 30 minutes from the strata. Later than evening, I ended up piecing together 40 of them to create the center of my challenge quilt. At this point I had not yet decided what I was going to do with it. I basically had a big giant donut of MM fabrics. The easiest solution for me was to applique the ring design down to a piece of the solid white fabric. I used invisible thread and my sewing machine to do invisible machine applique on both the inner and outer borders of the circles.

Next I set off to quilt the challenge and decided to utilize my machine quilting skills to enhance it with a wide variety of hand guided stitching patterns. I started in the center of the quilt and used a radiating arc pattern in hopes it would give the quilt some movement. I used rulers to stitch the radiating lines before stitching the arched patterns.


Next I quilted the MM fabric wedges with a myriad of patterns with no marking, just me, my machine and some ruler work. Here is the bottom left side of the quilt. The picture shows one of my favorite sections with a free hand peacock feather in the quilting. I did a bit of research on Pinterest and Google to find some stitching inspiration. Next is the bottom center of the quilt, and yes, those are supposed to be coffee beans in the one wedge. It was 1:45 a.m. when I finished stitching for the night. The next picture is of the bottom right corner of the quilt, where I tried to use a fish scale pattern for the first time. I like it alot and will use it again.

This shows the detail in the top left corner of the quilt and it was the first section of the background fabric that I quilted after finishing the arc sections. I used my rules to extend the arch sections out to the borders and then quilted various patterns in those sections of the background. The next picture shows the top center of the quilt. And here is the top right corner of the quilt. It contains another peacock feature motif and a section of checkerboard quilting also.

As you can see if you look at the quilting, I mixed up modern quilting designs with some more traditional ones.

Here is a photo of the entire finished quilt. I hope you like it as much as I did making it! The finished size of this quilt is 41" x 50" wide. I decided a white binding was the best option so that your eye isn't distracted from the beautiful MM fabrics in the piecing.


And finally, here is a quick partial shot of the back, so you can see, it really is quilted very heavily.

The name of the quilt came from my brother Steve, who said it looked like Iron Man's Arc Reactor that he wears on his chest. Works for me!

#MichaelMillerChallenge #ModernQuilt #ArcReactor

Sunday, July 13, 2014

Ravioli Casserole

One of today's adventures was to do my bi-weekly grocery shopping. Before I perform this task, I always try and look through some recipes to figure out what I might need. Sometime. I make a list especially when trying a new recipe, and other times,I go with the store flyer, look at what might be in sale and work from there.

As I was cruising down the dairy aisle, picking up some sliced cheeses for,sandwiches and shredded cheese for recipes, along with our yogurts and other dairy delicacies, I looked up and saw the big bag of round cheese ravioli was on sale. So I grabbed it and figured, well, those are always good to,have on hand.

When. Mike came back from his treatment today, I asked him what he would like for dinner. He picked the ravioli!

Here is what I used to make 6 servings of my Ravioli casserole:

1 jar low salt tomato sauce ( any brand you like will do.)
1 large bag of frozen ravioli (cheese work best)
1 bag of fresh spinach (I had this on hand already)
2 cups of shredded mozzarella cheese
1/2 cup Fresh basil (if available). Or 2 tsp dried basil
Onion flakes
Fresh ground pepper
Dried oregano to taste
fresh sliced mushrooms if desired.

Spray a large rectangular baking dish with non-stick spray. Add just enough of the tomato sauce to the bottom of the pan to coat. Add one layer of frozen ravioli. Take freshly washed spinach and chop up over the pasta. I use a clean pair of scissors (not my sewing shears) to shred the spinach. Top with 1/4 cup of cheese, sprinkle 1/3 of the spices over this layer. Drizzle with tomato sauce and repeat until you have 3 layers and have used all the ravioli, sauce, spinach and cheese. add the mushrooms to the two top layers along with fresh basil leaves.


On the top layer, add 3 TBSP of shaved Parmesan cheese and some fresh basil, shredded. Cover with a piece of foil and bake for 60 minutes in a pre heated oven at 350 degrees. The beauty of this recipe is that is basically one dish, easy to make, extra tasty and fabulous leftover. You don't have to defrost the ravioli or boil them. serve with a nice mixed salad and you have a great vegetarian dinner for 6.

Enjoy!

#RavioliCasserole #OneDishDinners #EasytoBakeDinner #SpinachRavioliBake

Friday, July 11, 2014

Happy Customers

There is nothing more satisfying to a small business owner than happy customers. Today was a wonderful day, the weather is nice, my backlog is getting smaller and a new customer came by to pick up her finished quilt.

I had spent a good amount of time, contemplating how best to finish her quilt. We had picked out some patterns that she liked and so I felt I understood her taste in quilting. The quilt was a sampler quilt, something she had created over 12 months, one block at time each class at a local shop. The background fabric of the top was white and the colors in the printed fabrics were purple, pale green and grey. The piecing was impeccable, seams were straight, corners matched, nicely pressed and the quilt top was flat and square.

She had told me she wanted to use modern motifs in the blocks, but to use my judgement and custom quilt it where I saw fit. So....I did. I used the border panto she had selected, an Aztec type continuous stitching pattern that had angles and swirls in it, a great match to the designs in her blocks. The sashing pieces were about 2 inches wide and white, they needed a cool design to set them off. I used a figure 8 which really had a pretty effect in white thread. If you look at the inner border on each block you will see there is a figure eight shape, which was the inspiration for this choice.


Some of the blocks required custom quilting which I love to do. The 8 pointed star block really spoke to me to quilt it with plenty of detail. We had selected a basket weave pattern to be used somewhere on the quilt, and this block was perfect for it in the background area. In addition, the center of the star really need to pop and flow outwards, so I quilted it with an arched pattern in each wedge of the inner star, then a simple pattern in the diamonds of the star itself that mimicked other patterns in the quilt.


I'm pretty sure from Agnes' reaction, this star was her favorite block. The Job's Tears block also employed this same arched pattern in the points of each star and I love the effect of movement it created.


Here are some of the other blocks, which I quilted with custom designed modern patterns.


For the next two blocks, I employed my rulers and some straight line quilting along with some free form fun.


And finally to finish them off, I decided both of these next two blocks needed quilting that would give the illusion of movement.


Here is a shot of the entire quilt just before it went home with the owner, Agnes Dembia of Clifton, NJ. She was thrilled with my work and I have a feeling she will be showing it off to her friends and guild in the near future once its bound. A happy customer is usually a repeat customer and that is the heart of a successful long arm quilting business. I know she will be back with more quilts for me to quilt for her.